Preparation is critical to producing a fantastic product for finishing or re-finishing surfaces for fine finish cabinets to be painted. Whether you’ll be brushing, rolling, or spraying your products doesn’t matter. The surface or material you’re applying the finishing to must be prepped so that the substrate is ready for long-lasting adhesion and ease of use for further preparation like sanding and filling. We prefer fine finishing for most trim, enamel, and door applications and produce top-quality results for our client’s projects and homes. For this process to be successful, we follow multiple steps specific to our unique fine-finishing process.
What makes our fine finish cabinets process so unique?
- 1. We control the process basics from raw wood to your factory-finished desired result. We source all premium products for a unique and custom finish on your project.
- 2. We start by sanding everything to a smooth finish. We then vacuum the dust off with a bristled attachment. Raw wood is usually coated with a glaze to protect it, so we make sure to remove that.
- 3. To ensure a smooth surface, We fill any knots and holes with glazing putty or spackle.
- 4. We then move into priming. We do sprayed and brushed priming, but we highly encourage spraying for a better finish.
- 5. We sand, vacuum, and then perform a final microfiber tack cloth wipe-down to remove the slightest imperfections.
- 6. Next, we spray or brush the first topcoat (or sometimes the second prime coat, depending on your product)
- 7. We then sand the first coat for smoothness, vacuum again, and then tack.
- 8. We finally spray or brush the second and sometimes final coat of high-quality paint.
- 9. Repeat steps 6 and 7, if necessary.
Fine-finish Painting Tips and Tricks
The fine-finish painting process depends on several factors, like the type of product used and how it was applied. The thickness of the achieved paint coating and any other specific factors requested on the project. Usually, two coats are perfect when the right product is selected and applied to the manufacturer’s recommended specs. If you have oil residues on your products’ surface from knots or manufacturing, you will want to spot-prime those in between prime and topcoats as the tannins will likely bleed through as small dark dots. If you’re using pre-primed products, skip to step 3 and follow accordingly. If you notice any small remaining voids you don’t wish to see in your topcoat, make sure to putty/spackle them before you begin topcoat products, or they will flash, and you’ll see the difference in the final sheen.
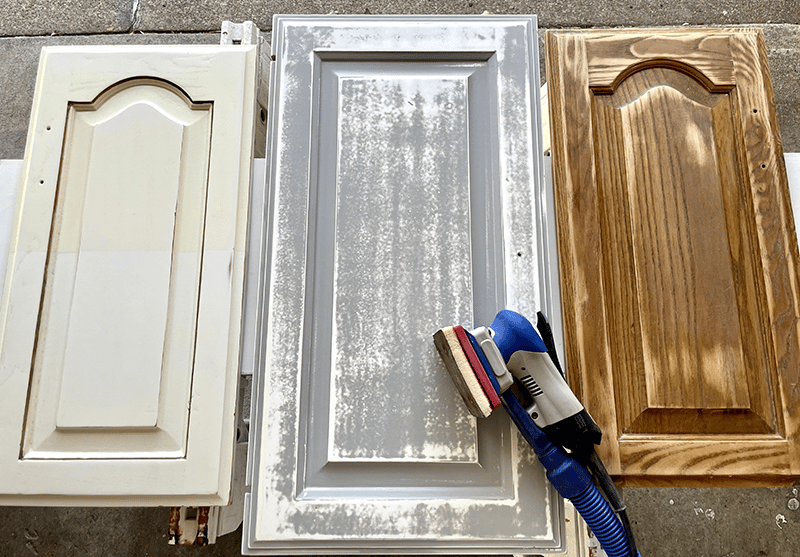
Removing Dust From Your Fine Finish Cabinets Painting Project.
One thing we haven’t elaborated on is dust collection. As you see above, we vacuum off our substrate between coats to remove any dust we’ve created to have the surface as smooth and free of debris as possible before applying new coats of product. This step in our process is only one of the necessary components of achieving the top-level results we aim for in each fine-finishing paint project we tackle.
It doesn’t matter if it’s simply painting baseboards or coating a new cabinet for a kitchen remodel. The final results are excellent when we create smooth surfaces and then clean them accordingly between coats. We utilize sanding equipment with HEPA-equipped dust collection, drastically increasing the quality while significantly reducing the time required to achieve such results. A basic shop vac with a dust sock over your vac’s filter will achieve similar results and save your filtration from being damaged by the finite dust created when sanding for a fine finish cabinets project.
If you would like help on your next fine finish cabinets, painting or remodeling project, Haviland Home Services is here to help. Our professional crew is ready to make your home beautiful today. Give us a call or fill out our web form to get started!